[VM/Linux] Windows 환경에 Virtual Machine을 이용해서 Ubuntu(Linux) 설치하는 법
1. [VMWare 다운받기] VMWare workstation 홈페이지에 접속합니다.
https://www.vmware.com/kr/products/workstation-player/workstation-player-evaluation.html
VMware Workstation Player 다운로드 | VMware
VMware Workstation Player 15 VMware Workstation Player는 Windows 또는 Linux PC에서 단일 가상 머신을 실행하기에 가장 적합한 유틸리티입니다. 조직은 Workstation Player를 사용하여 관리형 기업 데스크톱을 제공할 수 있으며, 학생과 교육 관계자는 학습 및 교육을 위해 사용할 수 있습니다. 무료 버전은 비상업적적인 개인 및 가정용으로 사용할 수 있습니다. VMware는 또한 학생들과 비영리
www.vmware.com
2. [VMWare 다운받기&설치] 윈도우 버전을 클릭하여 다운 받은 뒤, 실행 후 next를 눌러서 설치를 완료합니다.

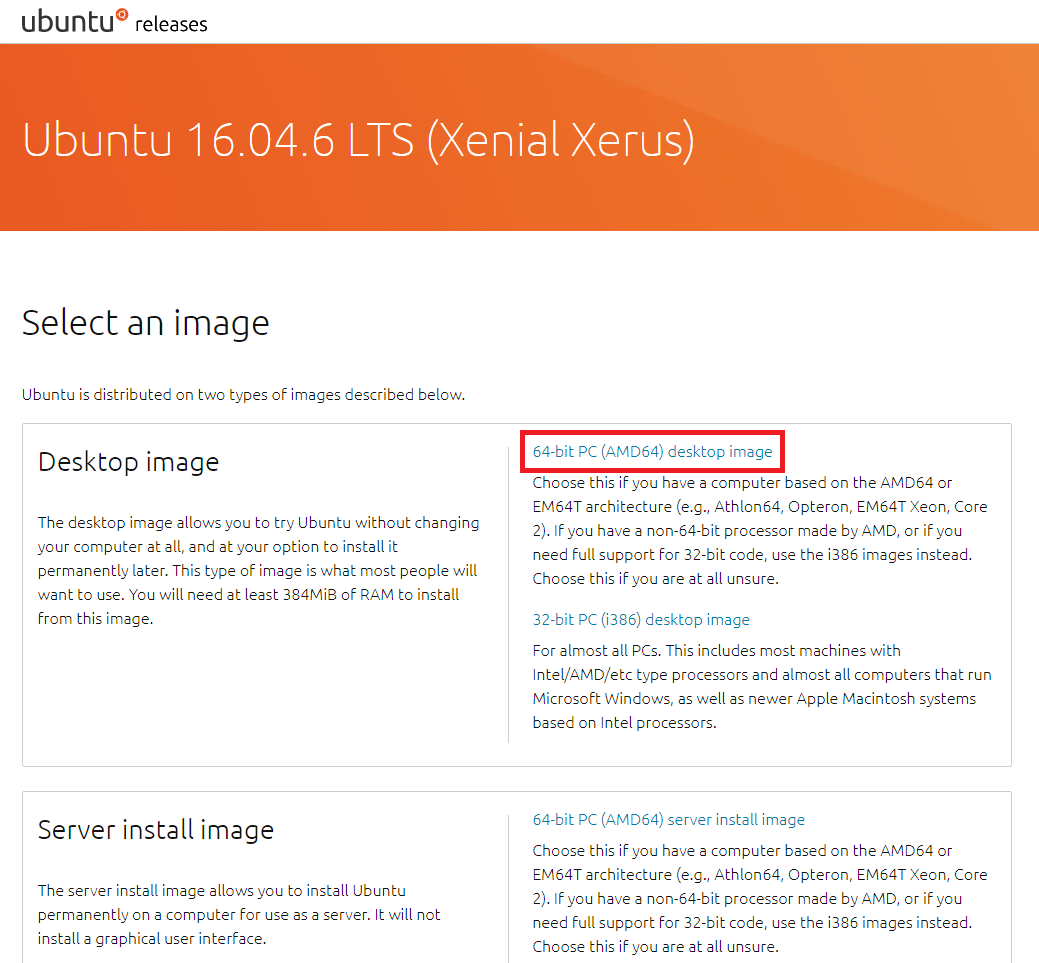
3. [Ubuntu 다운받기] VMware가 설치되는 동안 Ubuntu 홈페이지에서 16.04 LTS 버전 64-bit Ubuntu ISO 파일을 다운받습니다. (64-bit PC (AMD64) desktop image 링크 클릭) [다운받게 되면 뭔가 zip프로그램에서 열 것 처럼 나와있는데, 얘는 압축풀면 안됩니다! 나중에 나올 iso disc image 올릴 때 iso 그대로 사용하는 겁니다.]
http://releases.ubuntu.com/16.04/
Ubuntu 16.04.6 LTS (Xenial Xerus)
Select an image Ubuntu is distributed on two types of images described below. Desktop image The desktop image allows you to try Ubuntu without changing your computer at all, and at your option to install it permanently later. This type of image is what mos
releases.ubuntu.com

4. VM웨어가 설치되었으면, 바탕화면에 화살표 3개짜리 VMWare Workstation을 실행해줍니다.

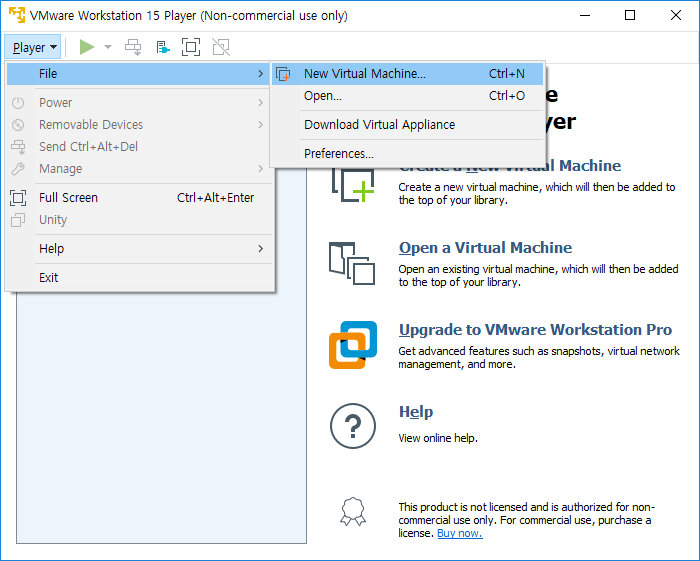
5. [Ubuntu VMWare에 설치하기] VMWare Workstation이 실행되면 Player -> File -> New Virtual Machine을 클릭합니다.

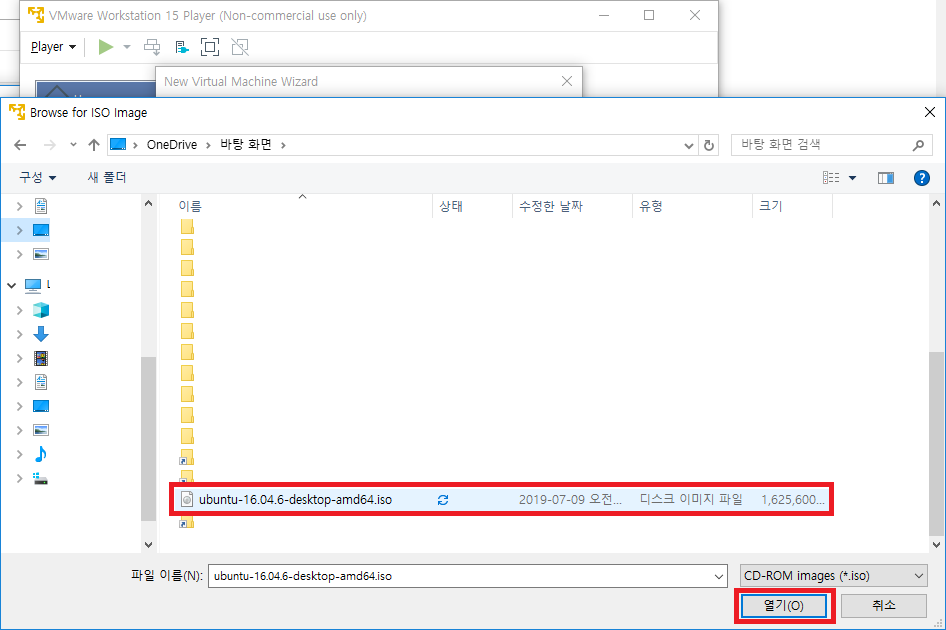
5. [Ubuntu VMWare에 설치하기] Installer disc image file란의 Browse버튼을 눌러 다운받은 iso 파일을 선택하여 open한 뒤 next를 눌러줍니다.


6. Full name, username, password에 linux 계정정보를 입력합니다.

7. next 버튼을 눌러서 진행합니다.

8. Maximum disk size를 설정합니다. (최소 20GB 이상으로 설정하는 것을 추천드립니다.)

9. next 버튼을 누르고 Finish 버튼을 눌러서 설치를 완료합니다.

10. Software update 팝업창이 나오면 Download and Install 버튼을 누릅니다.
11. 설치가 진행됩니다.
12. 설치가 완료되면 설정한 비밀번호를 입력하고 로그인합니다.
13. ubuntu가 제대로 설치되었습니다.
14. 다음부터는 VMWare Workstation을 실행한 뒤 목록에서 'Ubuntu 64-bit'를 더블클릭해주시면 자동으로 부팅이 됩니다.
'OS > Linux&Ubuntu' 카테고리의 다른 글
| [Linux/Ubuntu] 우분투 18.04 한글 설정! (12) | 2019.11.30 |
|---|---|
| [Linux] 우분투 설치 후 nvidia 그래픽 카드 드라이버 설정 (0) | 2019.11.29 |
| [Linux] 우분투 18.04 설치하기! (0) | 2019.11.28 |
| 우분투 반드시 설치 (0) | 2019.11.26 |
| [Linux/Ubuntu] Ubuntu OS 설치 USB 만들기! (0) | 2019.11.26 |